|
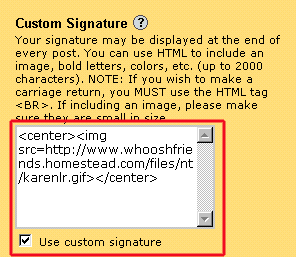
A custom signature is nice to have if you have an image or info about yourself or simply your name that you'd like to add to the bottom of each message. By making a custom signature, it will automatically add it for you without your having to type it in each time you leave a message. You'll find this option just below the Personal Icon area. It looks like this:
This area requires the use of html if you want something more than one line of typed text. I'll give you some basics here, but to learn more, go to the signature tutorial page. You can also get to this page from the message board by clicking on the tutorial link in the left column. You can simply type in info that you'd like to show up. It will look like plain typed text unless you add a few html codes to it. This is where the tutorial comes in handy. If you simply want a couple of lines, you will need to add a line break at the end of the first line so that the second line will drop below it. For example, for use on the Whoosh Friends message board, if you'd like to give your name and your stats, you can do this: Jane Doe<br> Atkins since 1/02<br>180/175/140 It will look like this: Jane Doe You can center this on your messages by adding the <center></center> tag. The first part <center> needs to go in front of your text and the </center> needs to go at the end. Make sure you add the </center> closing tag or it won't work properly. See the above image of the signature area for an example. You can also add graphics to your signature. As in the graphic above, I use a graphic in my signature. You'll need to use html code in order for it to show up. It's fairly simple. <img src=http://www.mywebspace.com/pictures/image.gif> In the example above, the bold text is the url for the image. You will need to change that to the url of the image that you'd like to use. Click here to find out how to give your graphic a url (address)! You can also center the graphic by using the steps I described above. For more information on how to change the color and size of the fonts etc, please see the font tutorial.
|